Building a USB Keep-Awake Device with MicroPython
A small excursion into the makerspace using MicroPython and the Adafruit Neo Trinkey to build a device that keeps your laptop awake - no more awkward screen timeouts during presentations!
Introduction
You know those viral videos about companies installing software to monitor if employees are actually working by tracking keyboard and mouse activity? Well, this post is certainly not about that, but about avoiding your laptop going to sleep during presentations, long-running tasks, or when you're just reading documentation on your screen.
This is a story of building a pocket-sized USB device that prevents my laptop from sleeping, complete with pretty LED animations and using touch buttons to control it. The entire project only took a couple of hours, thanks to MicroPython and the Adafruit Neo Trinkey.
Hardware
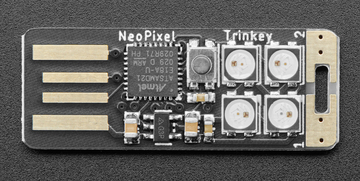
What is it?
- A tiny SAMD21 microcontroller (the same chip family used in the original Arduino Zero)
- Four RGB NeoPixel LEDs built right into the board
- Two capacitive touch pads you can activate by simply touching them
- USB-A connector that plugs directly into your laptop
- Costs under €10
Why is it perfect for this project?
- Plug-and-play: No breadboards, no wires, no soldering required. It's literally just plug it in and go.
- Visual feedback: The four NeoPixels give us beautiful RGB LED feedback so we always know what state our device is in.
- Touch controls: Two touch-sensitive pads mean we can toggle features without any physical buttons.
- Small form factor: It's so tiny you can leave it plugged in and forget about it.
- MicroPython ready: Adafruit has excellent support for running CircuitPython (a variant of MicroPython) on all their boards.
The beauty of this hardware choice is that you don't need any additional components. No resistors, no external LEDs, no complicated wiring diagrams. Everything you need is on this one tiny board. This makes it perfect for beginners or anyone who just wants to get a project done quickly without dealing with hardware complexity.
What's MicroPython?
Before we dive into the code, let's talk about why MicroPython is such a game-changer for hardware projects.
MicroPython is a lean and efficient implementation of Python 3 that's designed to run on microcontrollers. Think of it as taking the friendly, readable Python syntax you might know from web development or data science, and shrinking it down to fit on tiny hardware with limited memory and processing power.
Why MicroPython is perfect for makers:
- Instant gratification: No compile step. You write code, save it to the device, and it runs immediately.
- Interactive REPL: You can connect via serial and type commands interactively, perfect for testing and debugging.
- Rapid prototyping: Iterate quickly without the compile-upload-test cycle of traditional embedded development.
- Great libraries: Access to hardware features through simple, well-documented libraries.
CircuitPython vs MicroPython:
For this project, I'm actually using CircuitPython, which is Adafruit's fork of MicroPython. CircuitPython is specifically optimized for Adafruit hardware and includes additional libraries for their products. The differences are minor, think of CircuitPython as "MicroPython with batteries included for Adafruit boards."
Installation
Getting started with CircuitPython on the Neo Trinkey is surprisingly simple:
Step 1: Download CircuitPython
- Visit circuitpython.org
- Find the Neo Trinkey M0 page
- Download the latest
.UF2file (around 150KB)
Step 2: Enter Bootloader Mode
- Plug in your Neo Trinkey
- Look for the tiny reset button on the board
- Double-click it quickly (like double-clicking a mouse)
- The board will reboot and appear as a USB drive called
TRINKETBOOT
Step 3: Install CircuitPython
- Drag and drop the
.UF2file onto theTRINKETBOOTdrive - The device will automatically reboot
- It now appears as a drive called
CIRCUITPY - That's it! CircuitPython is installed.
Step 4: Install Required Libraries
- Download the Adafruit CircuitPython Library Bundle
- Extract the bundle and find the
adafruit_hidfolder - Copy the entire
adafruit_hidfolder into thelib/directory on yourCIRCUITPYdrive
Now you're ready to write code! The entire installation process takes about 5 minutes.
Development environment:
You can use any text editor you like. I personally use VS Code with the CircuitPython extension, but even Notepad works fine. Just edit the code.py file on the CIRCUITPY drive, save it, and your changes run immediately.
In the end the files on the USB stick should look like this
CIRCUITPY/
├── code.py
├── lib/
│   └── adafruit_hid/
└── boot_out.txt
Software: How It Works
Now for the fun part—let's look at how the code works. The beauty of MicroPython is that the code is remarkably readable, even if you've never written embedded code before.
The Big Picture
Our device has a simple state machine:
- Idle (blue LEDs) - Device is plugged in but not keeping the laptop awake
- Active (green LEDs) - Device is simulating user activity every 30 seconds
- Quiet mode - All LED animations are disabled for stealth operation
The user controls these states with two touch pads, and the device provides visual feedback through the NeoPixel LEDs.
Initialization and Setup
import board
import touchio
import neopixel
import usb_hid
import time
from adafruit_hid.keyboard import Keyboard
from adafruit_hid.keycode import Keycode
from adafruit_hid.mouse import Mouse

# Configuration
ACTION_INTERVAL = 30  # Seconds between keep-awake actions
ACTION_OFFSET = 5     # Seconds before first action
STATUS_LED_TIMEOUT = 2  # How long to show status LEDs

# Initialize hardware
pixels = neopixel.NeoPixel(board.NEOPIXEL, 4, brightness=0.2)
touch1 = touchio.TouchIn(board.TOUCH1)  # Left pad - toggle active
touch2 = touchio.TouchIn(board.TOUCH2)  # Right pad - toggle quiet mode
keyboard = Keyboard(usb_hid.devices)
mouse = Mouse(usb_hid.devices)
This initialization is beautifully simple. We import the libraries we need and set up our hardware. The board module gives us access to the specific pins on our Neo Trinkey, while neopixel, touchio, and usb_hid let us control the LEDs, touch pads, and USB HID (Human Interface Device) functionality.
Touch Detection
def check_touch_buttons():
    """Check if touch buttons are pressed and update state"""
    global is_active, quiet_mode

    # Touch 1: Toggle keep-awake on/off
    if touch1.value:
        is_active = not is_active
        flash_color((255, 0, 255))  # Magenta flash for feedback
        show_status_led()
        time.sleep(0.3)  # Debounce delay

    # Touch 2: Toggle quiet mode
    if touch2.value:
        quiet_mode = not quiet_mode
        flash_color((255, 128, 0))  # Orange flash for feedback
        time.sleep(0.3)  # Debounce delay
Capacitive touch detection is incredibly simple with CircuitPython. The touch1.value property returns True when you touch the pad. We add a small delay (time.sleep(0.3)) to debounce—preventing multiple triggers from a single touch.
Keep-Awake Actions
Here's where the magic happens. We randomly choose one of three actions to simulate user activity:
import random

def perform_keep_awake_action():
    """Randomly perform one of three keep-awake actions"""
    action = random.randint(1, 3)

    if action == 1:
        # Press F15 key (rarely used, non-intrusive)
        keyboard.send(Keycode.F15)
    elif action == 2:
        # Move mouse 1 pixel right and back
        mouse.move(x=1)
        time.sleep(0.1)
        mouse.move(x=-1)
    else:
        # Move mouse 1 pixel down and back
        mouse.move(y=1)
        time.sleep(0.1)
        mouse.move(y=-1)

    # Show action animation (unless in quiet mode)
    if not quiet_mode:
        circular_animation((255, 255, 0))  # Yellow animation
Each action is subtle enough not to disrupt your work:
- F15 key: Most operating systems don't have this key mapped to anything, so pressing it registers activity without side effects
- Mouse movements: Tiny 1-pixel movements that you won't even notice
LED Animations
One of the most satisfying parts of this project is the LED feedback:
def circular_animation(color):
    """Animate LEDs in a circular pattern"""
    for i in range(4):
        pixels.fill((0, 0, 0))  # Clear all
        pixels[i] = color        # Light up one LED
        pixels.show()
        time.sleep(0.1)
    pixels.fill((0, 0, 0))
    pixels.show()

def show_status_led():
    """Show current status with LED color"""
    if is_active:
        color = (0, 255, 0)  # Green for active
    else:
        color = (0, 0, 255)  # Blue for idle

    pixels.fill(color)
    pixels.show()
    time.sleep(STATUS_LED_TIMEOUT)
    pixels.fill((0, 0, 0))  # Turn off after timeout
    pixels.show()
The circular animation gives visual confirmation that an action occurred, while the status LED provides quick feedback about the current state. Keeping the LEDs on for only 2 seconds prevents them from being distracting during use.
Main Loop
is_active = False
quiet_mode = False
last_action_time = time.monotonic()

# Show initial status
show_status_led()

while True:
    # Check for touch button input
    check_touch_buttons()

    # Perform keep-awake action if active
    if is_active:
        current_time = time.monotonic()
        if current_time - last_action_time >= ACTION_INTERVAL:
            perform_keep_awake_action()
            last_action_time = current_time

    time.sleep(0.1)  # Small delay to prevent CPU spinning
The main loop is refreshingly simple:
- Check if the user touched either button
- If we're active and enough time has passed, perform a keep-awake action
- Sleep briefly to avoid maxing out the CPU
The time.monotonic() function gives us a steady clock that doesn't jump around due to time adjustments, perfect for timing-based logic.
Conclusion
Building this keep-awake device was a perfect introduction to the makerspace world. In just a couple of hours, with about €10 worth of hardware and around 100 lines of Python code, I created something useful that hopefully sparks the imagination.
What makes this project special:
- No complicated hardware: Everything runs on a single, self-contained board
- Beginner-friendly code: If you can write Python, you can write MicroPython
- Immediate results: See your code changes take effect instantly
What you will learn:
- How accessible hardware projects have become thanks to MicroPython
- The joy of having physical feedback (LEDs!) for your code
- How simple USB HID programming can be
- That you don't need to be an electrical engineer to build cool hardware projects
Next Steps
If you want to extend this project, here are some ideas:
- Play around with the colors and timings
- Make an annoyance device with no LEDs flashing, but randomly moves the mouse every now and then
- Randomly let it type 'All your base are belong to us' every now and then
- as a (not very secure) authentication device: store and let it type out your password when pressing one of the touch buttons
References and Resources
- Project Repository: github.com/gertjana/trinkey_keep_alive
- Hardware: Adafruit Neo Trinkey
- CircuitPython: circuitpython.org
- CircuitPython Libraries: CircuitPython Bundle
- Adafruit Learning System: Tons of great tutorials at learn.adafruit.com
A word of caution: While this device is great for legitimate uses like preventing screen timeout during presentations or while running long tasks, please be mindful of your workplace policies. This isn't a tool for circumventing employee monitoring systems—that would be both unethical and likely against your employment terms. Use it responsibly!
Now go forth and explore the makerspace! MicroPython and Adafruit make hardware projects accessible to everyone, and the only limit is your imagination. Happy making!